1.) Most hard drive manufacturers have utilities available on their websites free of charge that facilitate the move from one hard drive to another. Maxtor, for instance, has MaxBlast, though it requires at least one of the two drives to be a Maxtor.
Otherwise you can purchase software such as Norton Ghost or Acronis TrueImage to clone one hard drive to another, or even to CDs/DVDs.
================================================== ======
2.) You can actually reformat the hard drive using your Windows XP CD. However, other utilities such as DBAN and KillDisk are free and more thorough.
================================================== ======
3.) You can click here for a step-by-step guide to performing a clean installation of Windows XP. Reinstalling other software is standard, though...insert the CD or double-click the installer and follow the on-screen prompts.
================================================== ======
4.) Organization is up to you. Some prefer using folders to organize their data while others place all files in a single folder so there's only one place to look for them. It's however you feel you'll find what you need the fastest.
================================================== ======
Note, though, that what you plan on doing isn't going to work as you intend. If you ghost/clone the hard drive, wipe the hard drive, and then restore the hard drive you are restoring all of the "junk" with it, throwing several hours of work down the drain.
What you'll want to do is copy-and-paste your important files to the external hard drive, wipe the hard drive, reinstall Windows XP from scratch (follow the link above), and then reinstall all wanted program from scratch and copy-and-paste back your files from the external hard drive.
Better yet, save yourself the time and effort and just delete what's unneeded...unless you are having serious problem with your computer there's no need to wipe the drive and start over.
NOW PREPARE
What you'll need:
- A Windows XP machine in dire need of a fresh start
(Without any crucial, un-backedup data on it) - A Windows XP installation CD with a valid Product Key
(Preferably the disc that shipped with the computer originally, in which case the Product Key won't be obviously listed) - The CDs and serial numbers of all the software you need to install on your fresh "new" machine
- Hardware driver discs that shipped with the PC and any components you added on
First, make sure absolutely NOTHING you cannot afford to lose is on the drive you're going to install Windows on (let's say the C: drive.) Move all your documents and settings off the machine. Back up your Firefox settings with MozBackup, export your Quicken file, SyncBack profiles, Apache configuration and absolutely anything else that you want restored after you're done. Just make sure it's off the machine that's going under the knife.
STEP 1.1
Start your pc press delete or F12 as per ur motherboard to get to bios settings
there change the boot device pririty to your cd/dvd drive from fDD in the 1st boot device..
exit with saaved changes
STEP 1.2
REStart your PC, place your Windows XP CD in your CD/DVD-ROM drive.
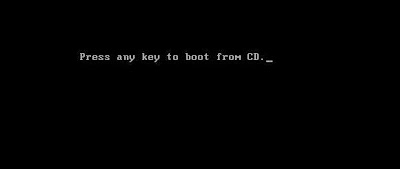
Your PC will automatically detect the CD and you will get a message saying "Press any key to boot from CD".(note: if your PC not automatically detect the CD, please go to last step)
Press any key to boot from CD and Windows setup will begin.
Windows will start copying preliminary setup files to your computer.

STEP 2
You will be asked if you want to
-perform a new installation,
-repair an existing installation,
-or quit.
In this situation, you will be performing a new window installation. So chose new installation.
Press Enter

STEP 3
You will be presented with the End User Licensing Agreement. Press F8 to accept and continue.

STEP 4
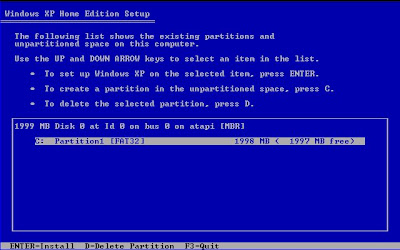
Select the partition where you want install windows. You will have the opportunity to create and/or delete partitions or just allocate the available disk space to one partition. Press Enter

STEP 5
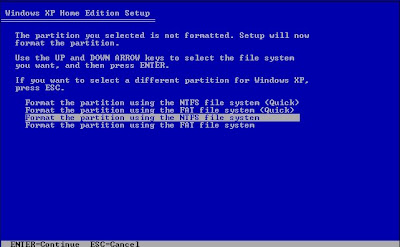
Next it will asks if you wish to use the NTFS or FAT32 to format the partition.
Choose to either FAT32 or NTFS.
I recomend you to use NTFS.
-You also can choose FAT32, but you will not have all stability features of Windows XP.
-Don't use quick, if you want batter file system
Choose your type, than Press Enter

When asked to start the format, press the "F" key. The formatting process may take quite a bit of time depending on the size of your HDD.

STEP 6
Click next

STEP 7
Type in your name and organization. Than click Next

STEP 8
Enter your Windows XP 's product license key. Than click Next.

STEP 9
Enter your PC name at 'Computer name'.
Choose your administrator password. You can leave it blank if you did't want put it yet.
Click Next.

STEP 10
Choose 'Date & Time' and 'Time Zone' where your country are, or closest to you
Click Next

STEP 11
Choose 'Typical settings', click next

STEP 12
Just click next, you are allow to change your setting after finish setup window xp

STEP 13
Click OK.


STEP 14
Click next on the green button below for next step.

STEP 15
Choose your option, than click next
STEP 16
If you have internet connection or LAN choose it, than click next
Or, if you have no internet connection or LAN, click Skip button


STEP 17
If you, want to register with Microsoft now,


STEP 18
Add users that will sign on to this computer.


Step 19. Install any missing drivers.
Once you get Windows XP up and running, chances are everything on your computer won't be working perfectly. Are you connected to the internet? Can you play music? Is your screen resolution unusually large? The answer is probably no to all those questions, except the last one. Do not panic. This is the part where you install the right drivers for your hardware. First, get a list of what Windows doesn't have installed correctly. From Control Panel, go to System, then Hardware, and click on the Device Manager. Chances are it'll look something like mine did after my fresh installation:
Now, you done!!.........

Related Posts :
1 Comments to "How to Clean Format HardDisk View **"
Categories
Recent Posts!
Archive
-
▼
2010
(60)
-
▼
May
(13)
- Shutdown Your Pc In 3 Seconds!
- How to make an SMS Flooder for any website!
- Gmail Redesigned - Globexdesigns.com
- Change Admin Password - If Logged In
- Open - Close CD-ROM Virus VBscript
- Customize Internet Explorer's Title Bar!
- Staying Safe & Secure On Orkut ~ Tips!
- Hack Windows Xp Administrators Password! - the N00...
- Scare your friends with Fake Virus!
- Disabling Error Reporting in XP
- How to Clean Format HardDisk View **
- Shortcut keys for Windows Media Player
- Yahoo Messenger Shortcut Keys + Hidden Emoticons!
-
▼
May
(13)
Recent Comments
Followers
My Blogs
Feedjit


devraj says:
sir pls can u send me ghost or norton fullversion anti virous in my G A/C
many-2 thnx for this